Friday, October 30, 2015

Continental Knitting Demo - Fix My Purl Technique???


I remember learning to knit when I was about 8 years old sitting beside my Grammie who was just so good at every craft you can imagine.  She even had award winning Dahlias!  But I stuck with the crochet as a child, thinking (wrongly) that it was easier to rip out tons of stitches if I had a mistake than it was in knitting.... until I learned to do "Knitting Surgery" and just drop down to the mistake, correct it and go back up... but that was years later!

When I met my friend Laura www.PoorMissFinch.com she inspired me -  actually, now that I think about it, she just ridiculed my crochet -  until I picked up knitting again.... Of course, La knits English, or "throws" with her right hand.  I caught back onto the knitting pretty quickly as she is an amazing woman and a great teacher (but No, I don't knit socks inside out! Ahem....) ... many of the things Grammie taught me as a kid began to come back... I just had to hold my yarn in my left hand like I did in crochet. (and I'm not knocking crochet, I still do a little from time to time!)

So, I began figuring out how to do it with the yarn in my left hand.  This was before the age of the world wide web and youtube and everything else we have to learn from.... this was the dark ages where we actually read books made of paper and talked to our friends face to face....

I have over the years developed a way to purl that works and I am reasonably fast at it. I'm not trying to brag, but I am a pretty darn good knitter! For being mostly self taught and learning from articles like Interweave Knits and later on Knitty.com, Ravelry and various websites, I feel like I could do just about anything I wanted to make.  I have done all kinds of things, my favorites being intricate lace with beads and Moebius! However, I have always felt I could find a better way to purl... I've tried all kinds of things, read articles, watched other knitters who also knit Continental (who knew my weird left hand way of knitting had a name!) and still, I kept going back to the weird way I was doing the purl... I remember Grammie was smooth and fast and couldn't figure out what I was doing wrong.  Unfortunately, despite several communications with our great Lord and Savior, she hasn't whispered any advice in my ear. Or if she did, I wasn't getting it.  

Today, I found this video with Lorilee Beltman, owner of City Knitting in Grand Rapids... She makes purling look smooth!  I am excited to grab some yarn and get to purling!  I never thought I would say that!!!

Friday, October 16, 2015

Holy Smokes!

I just realized that the whole summer has gone by like a flash! I have been busy creating, both in the sewing room and knitting, I just haven't been posting. Unfortunately, a lot of things have already been given away, so I may never get a good picture of them. I will make an effort to photograph what I can this Sunday and put it online.

I am hating these barometric changes. My ears are ringing and my head absolutely wants to explode! These migraine headaches are impossible when they get like this. The UW Headache Clinic now recommends a Cefaly device, $400.00 USD not covered by insurance... Yeah, great. It's like a TENS unit... I tell them that I already have a TENS unit, but of course, "This is not the same."

I am also excited about some videos I will be shooting with my friend Cheryl from Stitchin.Quiltin. I will post links back to my blog and YouTube. I am also starting more Dog Training videos! These will be in with my dog blog at www.PawsitiveStepsSeattle.com

Did I mention I passed the CPDT-KSA exam! Yay! Woooohoooo! Yippee! That was tough!
Just in time to order more business cards!

The gravel pit above our house has been burning for 7 days now. It started last Tuesday night around 6 PM. The firemen say it's the "rubbish heap"  (would that be the old abandoned house that used to be back there? hmmmm.. )  and that it is "under control" but how big is this thing? For Heaven's sake! And did it just happen to catch fire or was this unofficially planned? Thank Heaven smoke rises!  I would not have been able to stay in my own home (just like the 4th of July) because of the smoke otherwise. It's a pretty huge cloud of smoke to be going for a whole week!

Monday, May 04, 2015

Panels : cheater quilting or another way to make something beautiful?

I frequently get excited about making a quilt, or even small projects like table runners, placemats, etc., but forget the amount of time it takes to actually finish the entire process. Yes, you can send out a quilt to any number of wonderful big machine quilters who will take your pieced work of art and give it dimension and beauty. Great, beautiful quilting adds so much to the pieced top in addition to practical stability. Some will even bind it for you.

I tend to want to do the entire thing, but often am honestly in way over my head. I can't do those beautiful fans and feathers, YET... Someday, sooner than later I hope, but not yet. I have been working on quilting straight line, repeats, and getting creative using the fabric, the sewing lines and the contours of the prints, flowers, lines, shapes, etc., to do my quilting. I think it's important to be able to do that before I start all-over designs like stippling (which is one design that doesn't really appeal to me much) or other repetitive thing like stars, arrows, etc..  I love the freedom that free motion gives a quilter, and some of the quilts I have seen, well,  it's just amazing what the quilter did with the free space and design!

I am just beginning to really appreciate negative space, usually white, black or gray background for the piecing process as well as what can be done in it for quilting!

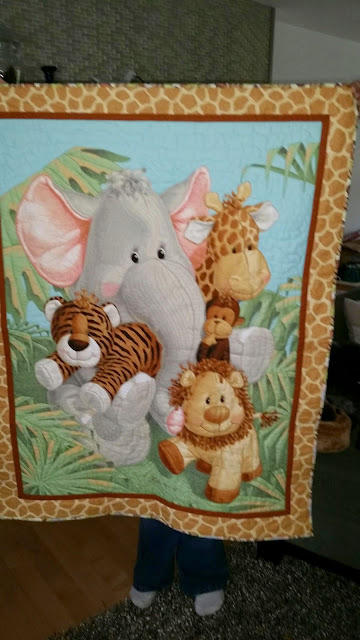
A few months ago, I picked up a panel quilt and some coordinating fabrics at the local fabric superstore and made a fun baby set. I thought that because I didn't need to piece it, that it would be a very fast project and I would finish it up in a few days.... Well, no.

The panel didn't require any piecing, since I wanted a baby or crib size, all I had to do was sandwich it, quilt and bind.

I was having trouble with my bobbin tension (not easily adjustable on most machines and I certainly didn't know how to fix it) so FMQ wasn't working. I did a little of it.... Most of which I ripped out. So I put on my walking foot and I just got creative. I let the picture be my inspiration. Talk about learning to make definition! It had a baby Elephant, Tiger, Monkey, Lion, and Giraffe (and hiding behind the Elephant was a Hippo, which appears in the coordinate fabric, so I figured it was just hiding in the quilt top!)

I started just doing contour quilting.  I started stitching along the outlines in matching color threads, and then detoured out  along the lines that gave the ears, feet, noses and stripes, a dimensional look. I found it really gave it a cool 3 dimensional feel.

I filled in the bigger areas with repeating lines, using my walking foot. Babies, I read, like the feeling of textures, so I made the elephant trunk in ¼ inch echoing lines down the full length, following the curves of the outer trunk image. Cool!

I am quite pleased! The big open sky needed something, and I found a decorative curve stitch which mimicked a cloud or wave feeling. One of the most fun parts was giving the animals 'hair, which was drawn like ribbons the 3D definition. I finally had to say ENOUGH, or I would still be doing definition on the grass or Tiger stripes, or something!

I had enough leftover material to make several burp cloths and a changing table mat. It was fun! I didn't have to design it piece it, I just got right into the quilting. I got great experience and opened up my creativity in a new way.  My  friend got something very unique that hopefully she and her baby will enjoy for years to come.

And to think,  I was actually feeling like such a cheater because it was a ready made top!

Thursday, March 19, 2015

The little extra features and Tip:Threading Needles

I am fortunate to have two sewing machines. One is a nice, not super fancy, but quality nonetheless, a Husqvarna Viking Lily. It's quite old now, but in great shape. I will never sell it, because I could never get anywhere near the value of it's usefulness to me. Used machines just don't seem to have much resale value.  It's got 6 menus for different stitches and can even do 3 small alphabets. Decorative stitches for applique and just having fun as well as the utility stitches, quilting, etc.  It's a workhorse. I have been using it while my Designer One was in getting a tune up. Now, I cannot complain about Lily in the least! She's reliable and a great sewer. I did some piecing and quilted a baby quilt for a client's grand baby who is coming soon. I will show that in the next post.

What I can say is, that I am spoiled by all the little extra features my Husqvarna Viking Designer 1 has that Lily doesn't.  Lily has a fix and stop stitch, as does my D1,they secure the threads at the beginning and end of sewing, similar to the way we stitch and back stitch a little to secure the seams.

What I first missed was the little needle threader my D1 has. Thankfully I can still see well to thread these things, but convenience! Wow.

Quick tip:  when threading a needle, it works best to prepare your thread. Thread is spun, twisted, to keep the strands together. Lay your thread across your left palm, (I am right handed) with the spool end towards your fingertips, cut end towards your wrists. Take sharp scissors and cut the thread from left to right at a diagonal angle to the thread, not a blunt cut across. Grasp the end near the tip so it remains pointed, not floppy. Do not lick the thread, just thread the needle. It helps to have good light and a white background behind the needle.  You can always use a thread assister, self threading needles which have a slotted top you pull the thread into, or a Clover needle threader. I actually use the thread cutter on the Clover threader to cut my chain pieces apart.

Another feature I am very happy to have back with my D1 is the automatic pressure foot lifter and lowerer.  I tried to stitch with it up on my Lily, just because I am so used to it lowering when I start to sew.

The third thing I missed, although this was much less significant, was the thread cutter. Yes, Lily has a thread cutter on the back like most machines do. My D1 has a button that you touch and it cuts the thread down in bobbin area. Even better, if you touch it while you are still sewing, but will stop, tie off the thread with the STOP feature and cut the thread. It leaves a nice inch long tail, saves thread and you don't have long strings in the way.

I love my Lily, she's a workhorse, but I am looking forward to doing some free motion quilting as soon as I finish a few quilt tops that are almost done on my D1.

The new fancy machines are Designer Diamond and Designer Ruby. I can't imagine all the cool stuff they have, but for now, I am thrilled with the old, fabulous machines I have now!

Sunday, March 08, 2015

Another year? Seriously?!

Ok, this is nuts... Well, I AM anyway...nuts that is! I constantly think, "I need to blog about this."  But do I? Hmmm, last published post 3.3.14 and this is 3.8.15. I guess the old "When I get a round Tuit" expression applies, I just need that Round Tuit!

So, we'll see how much better I do in 2015. I will say that this year I am feeling better and having less bad days, although the past 2 days have been migraine headache nightmare! I can't sleep and I can't lay still, and I don't want any bright lights, so only the phone on the darkest setting, no quilting, no sewing, no knitting.

I can however share pictures of a few projects that  I have been playing with these past 12 months. Fun gifts and goodies that I meant to blog about and never did.  Now, how to upload the pics...?